
A good work completion report format answers four questions: what was done, where, when, and whether it matches the scope. Put those answers in one document, with dated photos next to each claim. This post is for contractors and site engineers who must hand over work to a client or a PMC (project management consultant). It gives a copyable format, a photo checklist by stage, the usual reasons for rejection, and what a report cannot show.
What a completion report must answer
A reviewer opens your report with one aim: to decide whether the work is finished as agreed. Everything in the report should help them decide without phoning you.
Four questions cover most of it:
- What was done: the items of work, with quantities, against the work order or BOQ (bill of quantities).
- Where: the exact site, block, floor, line or location.
- When: start date, finish date, and the date of each key stage.
- Does it match: the scope, drawings and any approved changes.
If a page does not help answer one of these, cut it. A short report that answers all four is easier to approve than a long one that answers two.
The reviewer is usually not on site. They see only your pages and photos. Write for someone who has never visited.
The parts of a good report
There is no single legal format for every contract. Your work order, tender document or client may prescribe its own. If it does, follow that first and use the list below to fill gaps.
This is a format you can paste into a document and reuse:
| Part | What to write |
|---|---|
| 1. Project details | Project name, client, work order number and date, site address |
| 2. Contractor details | Firm name, site engineer, contact number |
| 3. Scope summary | The work ordered, in three to six lines |
| 4. Dates | Start, planned finish, actual finish, reasons for any delay |
| 5. Work done | Item, unit, ordered quantity, completed quantity, remarks |
| 6. Changes | Extra or dropped work, with the instruction or approval reference |
| 7. Photos | Numbered, grouped by stage, each with a one-line note |
| 8. Tests and measurements | Test results, measurement book (MB) page references, readings |
| 9. Open points | Snags or pending items, with who will fix them and by when |
| 10. Sign-off | Names, designations, date, and space for the client's remarks |
Keep each part short
The table in part 5 does most of the work. Quantities that match the running bill make the report easy to check. If you also send RA bills (running account bills), see our routine for RA bill photo proof.
Photo checklist by stage
Photos are the part reviewers trust least, because an ordinary phone photo carries no reliable proof of place or time. Take them at the stage when the work is visible, and number them in order.
Use the checklist below as a base. Adjust it for your trade.
Before work starts
- Site as handed over: wide shots from two corners, showing the existing condition.
- Name board or site marker: so the location is clear in the frame.
- Existing damage: close-ups of anything that already exists, so it is not blamed on you later.
During work, before it is covered
- Reinforcement, pipes, cables, earthing: the item, with a tape or scale beside it, before concrete, plaster or backfill covers it.
- Materials: labels, batch marks or delivery challan next to the material.
- Measurements: the tape reading in frame, not only the finished surface.
- Tests: the test in progress and the reading on the instrument.
Covered work cannot be photographed again. Treat this stage as the one you cannot repeat.
At completion
- Wide shot per area: the same angle as the before photo, so the change is clear.
- Close-ups of finish and joints: the places a reviewer is most likely to inspect.
- Fixtures and equipment: nameplates and serial numbers, readable.
- Cleared site: debris removed, area handed back.
Snags and fixes
- Defect: the problem, close up and wide.
- Fix: the same spot after repair, from the same angle.
For how this differs when a government department is the client, read what to keep for geo tagged photos on government work.
What to write on site
A photo without a note makes the reviewer guess. Notes take ten seconds each when you write them at the spot, and an hour when you try to remember them a week later.
Give your foreman one line to follow: photo, then note, then move on. Say what the item is, where it is, and what stage it is at.
Sample notes:
- Block B, second floor slab, reinforcement checked before concreting.
- Main DB room, earthing strip connected, before covering.
- Terrace waterproofing, second coat dry, 14 sqm shown.
- Snag 3, door alignment, after adjustment.
Avoid notes like "work done" or "ok". They add nothing a reviewer can use.
Make it before you leave the site
A report made at the office, days later, depends on memory and on photos sent through chat. Chat apps often strip location data from images, so the reviewer cannot tell where a photo was taken. Our post on why WhatsApp isn't enough for progress photos explains this in more detail.
Making the report on site also lets you retake a missing photo while you are still standing there.
How to do it with Verafii
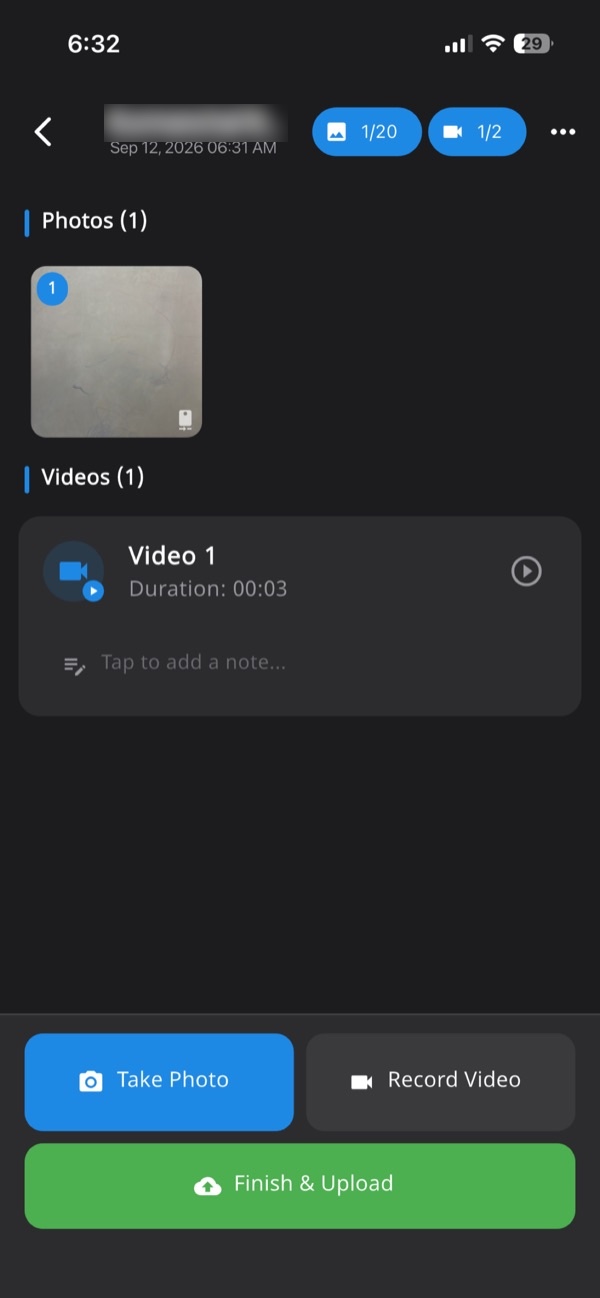
- Open the job in Verafii and start a session for the site. Every photo, video and note you add lands in this one job record, numbered and tied to the site.
- Take each photo with Verafii's own camera. There is no gallery or file picker, so everything in the report was captured live.
- Let the app burn the GPS position and time into each photo at the moment of the shutter.
- Add a one-line note to each photo or stage, using the sample notes above as a model.
- For a test or a moving part, record live video with audio and say what you are showing.
- If there is no signal, carry on. The capture works offline and uploads when the phone is back online.
- Before leaving, make the PDF report with one tap. It carries your customer's logo, the location, the device, the time and a QR code.
- Send the PDF to your client or PMC.
Anyone who receives it can scan the QR to open a public check page, with no account and no app. See how to check a Verafii report.
Verafii's reports and photo watermarks are in English, even though the app itself works in 11 languages.
Field, office, client
The same report passes through three sets of hands. Each needs something different.
Field
The site engineer or supervisor takes the photos and writes the notes. Their job is to follow the stage list and not skip covered work. Give them the checklist on one page.
Office
The office checks that quantities match the bill, that no stage is missing, and that open points are listed honestly. A manager can review all jobs on the web dashboard and export what they need.
Client
The client or PMC wants to decide quickly. Give them a report in the same order every time, so they find the dates, the quantities and the photos without searching. Whether they accept the work is always their decision.
Common reasons a client sends a report back
Most returns come from a few repeated gaps. Check for these before you send.
- No location in the photos: the reviewer cannot tell which site or block a picture shows.
- Dates that don't fit: a photo dated before the work order, or after the claimed finish.
- Missing covered work: no photos of items now hidden under plaster or soil.
- Quantities that don't match: the report says one figure, the bill another.
- Photos without notes: the reviewer cannot tell what they are looking at.
- Unexplained changes: extra or dropped work with no approval reference.
- Open snags not listed: the client finds one on a visit and doubts the rest.
- Photos that look edited or reused: a gallery image, a screenshot or a forward.
One honest note: the client may also return a report because of an unclear scope, not because of your photos. Ask what they need and fix that part.
How your client can check it
A report is more useful when the reader can test it. With a Verafii PDF, the client can scan the QR code and land on a public verification page. No account and no app is needed.
They can also drop the file they received onto that page. The file is fingerprinted in their browser, and nothing is uploaded. If the fingerprint matches, the file is untouched since it was made. One SHA-256 fingerprint covers the PDF, every photo and every video.
If a photo was taken with a fake location, Verafii flags it on the photo, the report and the verify page. It is a flag, not proof of intent, and GPS can drift near tall buildings or indoors. Ask the crew before you accuse anyone. Our post on fake GPS in site photos covers how to do that fairly.
What a report can't show
A completion report is a record, not a guarantee. Be clear about its limits, so that nobody is surprised later.
- Quality: a photo shows how work looked, not how strong or durable it is. Tests do that.
- Hidden work you didn't photograph: if you missed the stage, nothing can recover it.
- Acceptance: a department, PMC or insurer decides whether to accept a report. A fingerprint match means the file is unchanged, not that anyone approved it.
- Indoor and tight-site accuracy: GPS can drift indoors or between tall buildings.
- Portal upload: Verafii does not upload to any government portal and does not replace an official app. You still file where the client requires.
Checklist before you hand over
- Work order and site are named on the first page.
- Start and finish dates are written, with reasons for any delay.
- Quantities match the running bill.
- Before photos show the site as handed over.
- Covered work has photos taken before it was covered.
- Completion photos use the same angles as the before shots.
- Every photo has a one-line note.
- Tests and readings are included, with video where useful.
- Open snags are listed, with an owner and a date.
- The report is made on site, before the crew leaves.
Frequently asked questions
What should a work completion report include?
Include the project and contractor details, the scope, start and finish dates, items and quantities done, changes, numbered photos with notes, test results, open snags and a sign-off. If the work order prescribes a format, follow that first. Use the ten-part list in this post to fill any gap.
Is there a standard work completion report format in India?
Not one that applies to every contract. Many tenders, departments and clients give their own format in the work order or contract documents. Check those first, and use a general format like the one here only where nothing is prescribed.
How many photos should a completion report have?
There is no fixed number. Cover each stage: before, during (especially covered work), completion and any snag fixes. A reviewer should be able to match every claimed item of work to at least one photo.
Can I make the completion report before leaving the site?
Yes, and it is the better habit, because you can retake anything missing. With Verafii you capture live, add notes, and make the PDF report with one tap on site. The report carries location, device, time and a QR code.
How can a client check a completion report is genuine?
With a Verafii report they can scan the QR to open a public page, or drop the file in to compare its fingerprint. A match means it is untouched since it was made. It does not mean the work is of good quality.
Will Verafii make sure my completion report is accepted?
No. Whether a client, PMC or department accepts a report is their decision. Verafii shows where and when each photo was taken, flags fake GPS, and lets anyone check the file is unchanged. Acceptance is outside what it can do.
Does a completion report replace the measurement book?
No. The report summarises the work and points to the measurement book (MB) and bills. Keep the MB and any required test records alongside it, and refer to the page numbers in part 8 of the format.
Try it on your next handover
Run your next completion report through Verafii: start the 30-day free trial or ask for a quote. The price depends on your team: how many field agents and admin users you have, how long you keep evidence, and the photo and video quality you need.
