
To prove a preventive maintenance visit happened, take dated, located photos of each asset before, during and after the work. Add a short note and a reading where one matters, and build the report before you leave the building. This post is for AMC (annual maintenance contract) teams, facility managers and building owners. It covers the photo standard per asset, what to write, who does what, and what photos cannot show.
The AMC visit the client says never happened
A technician visits a commercial tower on the last Saturday of the quarter. They clean the chiller strainers, check the DG set, and test the fire pump. They send four photos on WhatsApp to the supervisor and leave.
Two months later the client's facility head says the quarter's visit was missed. The security register shows no entry for that day. The photos have no date on them, and two look like they came from an older visit. Nobody in the AMC office can say which is true.
That is the question this routine answers: can you show, on one record, that this person was at this site, on this day, working on this asset? The rest of this post is how to build that record without adding an hour to every visit.
Why disputed visits cost money and renewals
A disputed visit rarely ends with one argument. It spreads into the bill, the contract and the next review.
- Held invoices: the client withholds a quarterly or monthly AMC invoice until the visit is explained.
- Repeat visits: you send a team again, only to prove work you already did.
- Penalty claims: a missed-visit clause is applied when you cannot show the visit.
- Weak renewals: at renewal time, a client who doubts your records has less reason to trust the next year's promise.
- Blame on breakdowns: when a pump or lift fails, the first question is when it was last serviced.
This post makes no promise about payment or renewal. A clear record only removes the part of the argument that is about whether you went.
With proof and without
Here is the same visit handled two ways.
| Without a proof routine | With a proof routine | |
|---|---|---|
| Photos | Sent on chat, from the gallery, some old | Taken live, stamped with GPS and time |
| Who did what | Unclear which asset each photo shows | Photos numbered under one job record |
| Report | Typed days later from memory | One PDF made before leaving |
| If questioned | Phone calls and guesswork | The client scans a QR and checks the file |
Chat apps often strip location and time from pictures. A phone clock can also be changed. Our post on whether a photo's date and time can be changed explains how to check, and why WhatsApp isn't enough for site photos covers the chat problem.
The photo standard: before, during and after, per asset
Use the same three-stage set for every asset on the visit sheet: the AHU, chiller, DG set, UPS, lift machine room, fire pump, STP, water pump, panel. Consistency lets a reviewer scan a report in two minutes.
Stage 0: the asset and its tag
Frame the asset number plate or your tag in the first photo, with the equipment in the background. This ties every later photo to a named asset, not a room that looks like three others.
Before: the condition you found
Shoot the problem as it is: clogged filter, oil leak, loose belt, corroded terminal, dust on the coil. Take one wide shot and one close shot. If nothing is wrong, photograph the asset as found anyway.
During: the work itself
Show the action: the filter coming out, the belt being tensioned, the torque tool on the lug, the panel open with the technician's hand in frame. One or two photos is enough. They show the work was done by hand, on this asset.
After: the result
Take the same angle as the before photo. A reviewer compares the two without effort. Add a photo of any gauge, display or meter reading that matters, with the number readable.
Close the visit
Take one photo of the plant room entrance or the site board at the end. It helps a reader see the route you worked through.
Keep photos square on to the subject, with light on the part that matters. If a plant room is dark, use the phone torch.
What to write on site
Photos say what it looked like. A short note says what was done and why. Ask the technician to write one line per asset, before moving to the next.
The brief for the technician: asset, what you found, what you did, what is left.
Sample notes:
- AHU-3, 4th floor: filter choked, replaced both filters, belt tension checked, no noise on run.
- DG set 1: oil and coolant levels checked, battery terminals cleaned, no-load run done, reading noted.
- Fire pump: jockey pump started on pressure drop, readings noted, one gland leaking, to be reported.
- STP blower: not serviced, part awaited, client informed on the visit.
The last one matters. A note that says what you did not do protects you more than a visit that looks perfect.
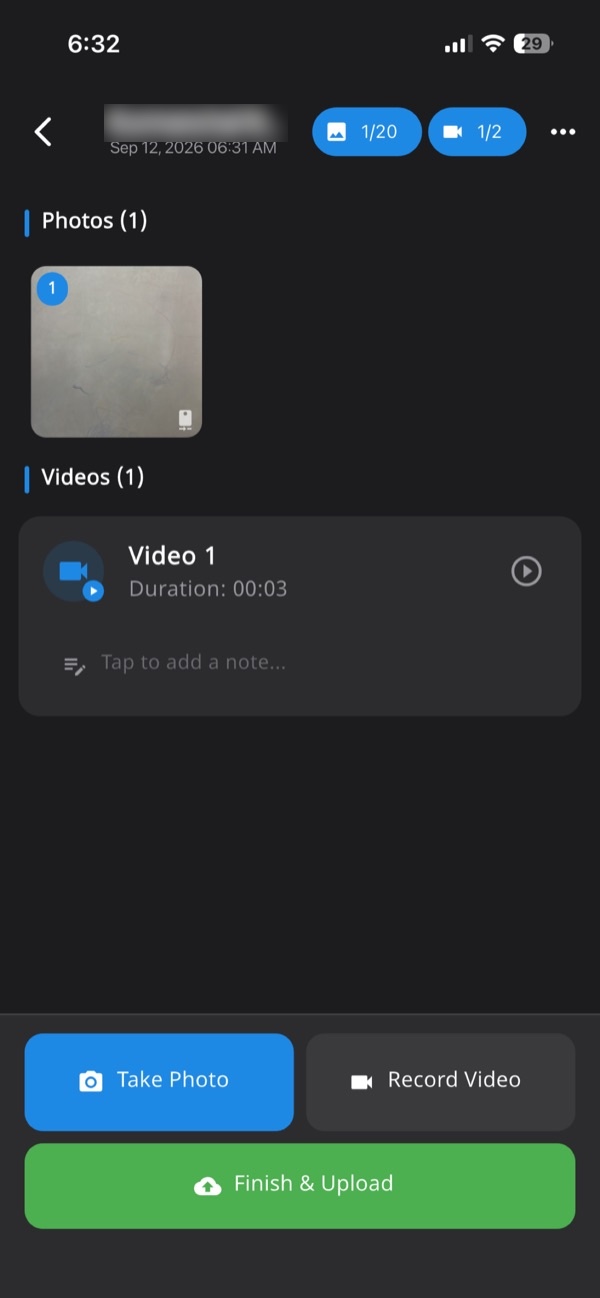
How to do it with Verafii
Verafii is a camera and report app. It captures live from its own camera, so there is no gallery to pick from. Your technician follows this order on site:
- Open the site and start a job for the visit. Every photo, video and note then lands in one numbered session tied to that site.
- Photograph the first asset's tag, then take the before, during and after photos. Each one is stamped with GPS and time at the shutter.
- Add the one-line note for the asset before moving on.
- In a basement or plant room with no signal, keep capturing. The photos upload when the phone is back online.
- Repeat for each asset on the visit sheet.
- Before leaving, make the one-tap PDF report. It carries your customer's logo, the location, device, time and a QR code.
- Send the PDF to the supervisor and the client from the site.
Anyone can then scan the QR to open a public check page, with no account or app. Dropping the file they received into that page fingerprints it in the browser, and a match means it is untouched. See how to check a Verafii report.
If a phone uses a fake location, Verafii flags it on the photo, the report and the dashboard, on Android and iPhone. A flag is a reason to ask, not proof of wrongdoing.
For the wider picture, see the site inspection app and the GPS camera photo report.
Technician, supervisor, client
Technician
The technician captures the three stages, writes the notes and makes the report before leaving. Their job is not to edit or choose photos later. They are in the room, so the record is made there.
Supervisor
The supervisor opens the report the same day. They check that each asset on the visit sheet has its set of photos and a note. They ask about gaps while the technician still remembers. Where a team uses geofenced sites and clock-in with a selfie, an attendance add-on, available on request and charged on top of the plan, shows hours and geofence status on the web dashboard. Treat it as a side note: the photos and report work without it.
GPS can drift in basements and near tall buildings. If a location looks off, ask before you accuse.
Client
The client sees the report as a PDF. They can compare before and after photos, read the note and scan the QR to check the file. What counts as proof of a visit is the client's decision, and your contract decides the rest. Share the report at the visit, not after the dispute starts.
Our work completion report format post is useful if the client also wants a closing document.
What photos can't show
A photo is a record of what the camera saw, where and when. It has limits.
- Performance: a photo of a chiller does not show cooling capacity. Only a test or a reading does. Record the reading in the note and photograph the gauge.
- Inside the equipment: a sealed compressor or a wall-buried pipe stays hidden.
- Quality of the work: a tightened lug looks the same as a loosely tightened one. A torque value or a test result says more.
- Time spent: two photos minutes apart do not show a full service.
- Weak signal and drift: GPS can be off indoors, in basements and near tall buildings.
- The client's view: the client or insurer decides what the record is worth. A report shows what the photos contain; it cannot settle that for them.
Use photos alongside the checklist, test readings, the client's signature and the contract. A customer signature in the report is an add-on, available on request.
The visit checklist
Print this or keep it on the technician's phone.
- Visit sheet: the list of assets for this visit, agreed with the site team.
- Job started: the visit's job opened at the site before the first photo.
- Asset tag: framed in the first photo of every asset.
- Before: wide and close photos of the condition found.
- During: one or two photos of the work in progress.
- After: same angle as before, plus any gauge or meter reading.
- Note: one line per asset, including what was not done.
- Offline areas: captured in the basement or plant room, then checked for upload on the way out.
- Report: one-tap PDF made before leaving the building.
- Shared: sent to the supervisor and the client the same day.
Frequently asked questions
What photos should go in a preventive maintenance report?
For each asset, include a photo of the tag, the condition before work, the work in progress and the result after. Add a photo of any gauge or meter reading that matters. Pair them with a one-line note on what was found and done.
How can an AMC contractor prove a visit happened?
Use photos stamped with GPS and time at the moment of capture, held in one job record for the visit. A report made before leaving the site, with a check page the client can open, makes the record easy to verify. The client still decides what counts as proof.
Do photos prove that equipment is working properly?
No. A photo shows that someone was at the asset and what it looked like. Performance needs a test result or a reading, such as pressure or current, written in the note and photographed on the gauge.
Can a technician take preventive maintenance photos in a basement with no signal?
Yes, with Verafii. It captures offline and uploads the photos when the phone is back online. Check the upload before the technician leaves the building, so the report reaches the supervisor.
Does Verafii track my technicians all day?
No. Attendance and live tracking are add-ons available on request and charged on top of the plan. Live tracking shows location only between clock-in and clock-out, and nothing is tracked outside work hours.
Can Verafii guarantee my client will be satisfied with the photos?
No. The client, insurer or department decides what a photo is worth, and Verafii cannot decide that for them. It shows what the photos and report contain: GPS, time, device, a QR code and a fingerprint that anyone can check.
How does a client check an AMC report?
The client scans the QR code on the PDF to open a public page, with no account or app. They can also drop the file they received into the page. A match means the file is untouched.
Try it on your next AMC visit
Start the 30-day free trial and run one real visit through the routine. There is a call at the end to decide whether to continue. The price depends on your team, such as field agents, admin users, how long you keep evidence and photo quality, so ask for a quote or start the free trial.
